
前言
为啥需要自定义模版?有可能当你们公司需要标准化代码格式的时候或者你自己需要把代码做个规范的时候,如果每次都要去写这些,麻烦麻烦麻烦!比如每次都要写这样的:
class ViewController: UIViewController {

//MARK:- life-cycle
override func viewDidLoad() {
super.viewDidLoad()
// Do any additional setup after loading the view, typically from a nib.
}

//MARK:- memoryWarning
override func didReceiveMemoryWarning() {
super.didReceiveMemoryWarning()
// Dispose of any resources that can be recreated.
}
//MARK:- setting

//MARK:- getting

//MARK:- outer function

//MARK:- inner function

//MARK:- delegate

}
这样写的好处想必大家都知道,就是可以比较清除的查找方法,就像这样
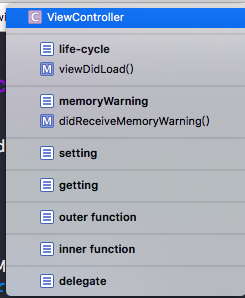
但是每次都要这么写一遍是不是很繁琐?是的!
接下来就可以使用xcode的模板功能,这里我不介绍修改系统的模版,这里着重介绍自定义的模版。系统的我们还是保留,只是多个扩展功能,这样也比较好,个人不是很建议直接改原文件,而是想给某一个类写扩展的方式实现。
自定义xcode模板
找到xcode的模板路径: /Applications/Xcode.app/Contents/Developer/Platforms/iPhoneOS.platform/Developer/Library/Xcode/Templates/
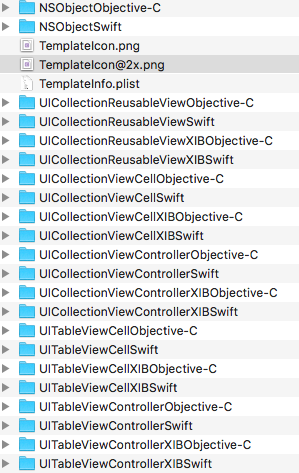
在File Templates文件夹下创建一个比如custom Templates的文件夹(文件名随意),把File Templates/Source/Cocoa Touch Class.xctemplate拷贝一份到刚才的文件夹下。
创建文件的时候会多出一项:
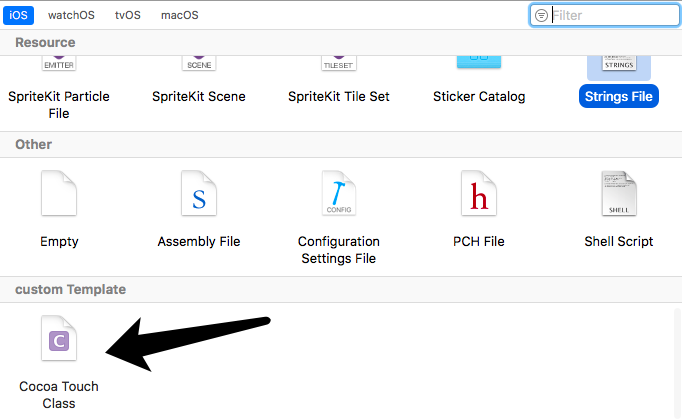
这里就是刚才拷贝的文件,现在可以直接修改里面你想要做自定义模板的文件了,
我们打开任意一个(以UITableViewControllerSwift为例),我们看到的是这样的
//
// ___FILENAME___
// ___PROJECTNAME___
//
// Created by ___FULLUSERNAME___ on ___DATE___.
//___COPYRIGHT___
//

import UIKit

class ___FILEBASENAMEASIDENTIFIER___: ___VARIABLE_cocoaTouchSubclass___ {

override func viewDidLoad() {
super.viewDidLoad()

// Uncomment the following line to preserve selection between presentations
// self.clearsSelectionOnViewWillAppear = false

// Uncomment the following line to display an Edit button in the navigation bar for this view controller.
// self.navigationItem.rightBarButtonItem = self.editButtonItem()
}

override func didReceiveMemoryWarning() {
super.didReceiveMemoryWarning()
// Dispose of any resources that can be recreated.
}

// MARK: - Table view data source

override func numberOfSections(in tableView: UITableView) -> Int {
// #warning Incomplete implementation, return the number of sections
return 0
}

override func tableView(_ tableView: UITableView, numberOfRowsInSection section: Int) -> Int {
// #warning Incomplete implementation, return the number of rows
return 0
}

/*
override func tableView(_ tableView: UITableView, cellForRowAt indexPath: IndexPath) -> UITableViewCell {
let cell = tableView.dequeueReusableCell(withIdentifier: "reuseIdentifier", for: indexPath)

// Configure the cell...

return cell
}
*/

/*
// Override to support conditional editing of the table view.
override func tableView(_ tableView: UITableView, canEditRowAt indexPath: IndexPath) -> Bool {
// Return false if you do not want the specified item to be editable.
return true
}
*/

/*
// Override to support editing the table view.
override func tableView(_ tableView: UITableView, commit editingStyle: UITableViewCellEditingStyle, forRowAt indexPath: IndexPath) {
if editingStyle == .delete {
// Delete the row from the data source
tableView.deleteRows(at: [indexPath], with: .fade)
} else if editingStyle == .insert {
// Create a new instance of the appropriate class, insert it into the array, and add a new row to the table view
}
}
*/

/*
// Override to support rearranging the table view.
override func tableView(_ tableView: UITableView, moveRowAt fromIndexPath: IndexPath, to: IndexPath) {

}
*/

/*
// Override to support conditional rearranging of the table view.
override func tableView(_ tableView: UITableView, canMoveRowAt indexPath: IndexPath) -> Bool {
// Return false if you do not want the item to be re-orderable.
return true
}
*/

/*
// MARK: - Navigation

// In a storyboard-based application, you will often want to do a little preparation before navigation
override func prepare(for segue: UIStoryboardSegue, sender: Any?) {
// Get the new view controller using segue.destinationViewController.
// Pass the selected object to the new view controller.
}
*/

}
平常我们新建一个UITableViewController的文件就是这样的,现在你可以修改这个模板成>为你自己想要的格式。定义好之后看起来就像这个样子(这里随意写的)
class TemplateTableViewController: UITableViewController {
//MARK:- life-cycle
override func viewDidLoad() {
super.viewDidLoad()

// Uncomment the following line to preserve selection between presentations
// self.clearsSelectionOnViewWillAppear = false

// Uncomment the following line to display an Edit button in the navigation bar for this view controller.
// self.navigationItem.rightBarButtonItem = self.editButtonItem()
}

//MARK:- warning
override func didReceiveMemoryWarning() {
super.didReceiveMemoryWarning()
// Dispose of any resources that can be recreated.
}

// MARK: - Table view data source

override func numberOfSections(in tableView: UITableView) -> Int {
// #warning Incomplete implementation, return the number of sections
return 0
}

override func tableView(_ tableView: UITableView, numberOfRowsInSection section: Int) -> Int {
// #warning Incomplete implementation, return the number of rows
return 0
}

//MARK:- custom1--------
//MARK:- custom2--------
//MARK:- custom3--------
//MARK:- custom4--------
}
自定义模板就是这样了, 我会不定期的发一些使用的技术文章希望大家多多支持关注

Social Menu